Looking to take your soap-making to the next level? Custom soap molds are the perfect solution for creating unique and personalized bars of soap. With endless design possibilities, making your own molds allows you to unleash your creativity and craft one-of-a-kind creations. In this article, we’ll explore the benefits of making custom soap molds and provide step-by-step instructions on how to create your own. Get ready to elevate your soap-making game and impress friends and family with your handmade masterpieces.
- Selecting the right materials for making custom soap molds
- Creating a design for the soap mold that suits your needs
- Understanding the different types of molds and their advantages
- Properly measuring and mixing the ingredients for the soap mold
- Allowing the soap mold to cure and properly unmolding the finished product
How can I create my own soap molds?
To make your own soap molds, simply find a cardboard box that matches the desired size and shape of your soaps. Line the inside of the box with plastic wrap or parchment paper that is large enough to cover the entire interior. Once the box is lined, pour the melted soap into it. This simple and cost-effective method allows for easy customization of soap shapes without the need for expensive molds.
How can I create my own molds?
Creating your own molds is easier than you think. One simple method is to make a 1-part soap, 10-parts water mix and add construction silicone. Press your desired shape into the clay and allow it to dry for a few hours. Another quick option is to knead together 1-part silicone and 2-parts cornstarch. Press your shape into the dough and wait just 20 minutes for your mold to dry. With these easy steps, you can make custom molds for all your crafting needs.
By following a few simple steps, you can easily make your own molds at home. One method involves creating a mixture of 1-part soap and 10-parts water, then adding construction silicone. Press your desired shape into the clay and wait for it to dry. Alternatively, you can knead together 1-part silicone and 2-parts cornstarch, press your shape into the dough, and wait just 20 minutes for your mold to dry. These straightforward techniques will allow you to create custom molds for any project you have in mind.
Don’t let the idea of making your own molds intimidate you. With just a few simple ingredients and a little bit of patience, you can easily create custom molds at home. Try making a 1-part soap, 10-parts water mix with construction silicone, or knead together 1-part silicone and 2-parts cornstarch. Press your desired shape into the clay or dough and wait for it to dry. In no time, you’ll have unique molds ready for all your crafting endeavors.
What material is best for soap molds?
When it comes to choosing the best material for soap molds, wood is the top choice for insulating cold process soap. Not only does it encourage quicker saponification through the gel phase, but it also provides a sturdy and durable option for creating your homemade soaps. Additionally, wood molds are versatile and can be easily customized to fit your specific soap-making needs.
If you’re looking for a reliable and adjustable option for soap molds, consider building your own wood soap molds using a helpful tutorial. By creating your own molds, you can ensure they are the perfect size and shape for your soap-making projects. With the added benefit of being able to adjust the width as needed, wood soap molds offer a convenient and customizable solution for crafting high-quality soaps.
In conclusion, wood molds are the best choice for soap-making due to their insulation properties and ability to speed up the saponification process. By building your own adjustable width wood soap molds, you can take your soap-making to the next level with a durable and personalized solution.
Creating Unique Soap Molds
Are you tired of using the same old rectangular soap molds? Step up your soap making game with our guide to creating unique soap molds. Whether you’re into geometric shapes, nature-inspired designs, or intricate patterns, we’ve got you covered. With our easy-to-follow instructions and creative ideas, you’ll be able to customize your soap molds to reflect your personal style and stand out from the crowd. Say goodbye to boring bars of soap and hello to one-of-a-kind creations that will impress your friends and family.
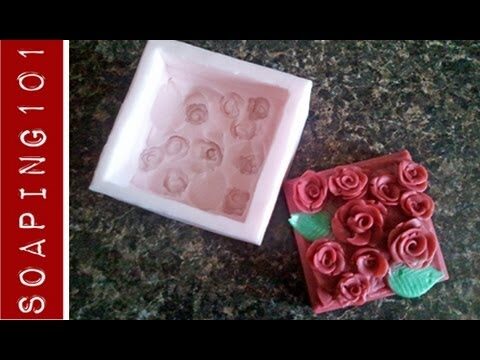
Step-by-Step Mold Making
Are you looking to create custom molds for your artistic or professional projects? Look no further! Our step-by-step mold making guide will walk you through the process with ease. Whether you’re a beginner or experienced mold maker, our clear and concise instructions will help you achieve flawless results every time.
First, gather your materials and prepare your workspace. You’ll need silicone rubber, a mold box, mold release agent, and your original object to be molded. Once you have everything ready, carefully mix the silicone rubber according to the manufacturer’s instructions. Pour the rubber over your object in the mold box, making sure to eliminate any air bubbles. Allow the mold to cure for the specified time before carefully removing your object from the mold.
Next, it’s time to demold your object and admire your handiwork. Use a sharp knife to carefully cut the mold open and remove your object. Clean any excess silicone from the mold and prepare it for future use. With our easy-to-follow steps, you’ll be able to create professional-quality molds for all your projects in no time. So what are you waiting for? Start creating your own custom molds today!
Designing Your Own Soap Shapes
Unleash your creativity and personalize your soap making experience by designing your own unique soap shapes. Whether you prefer geometric patterns, floral motifs, or whimsical animals, the possibilities are endless when it comes to customizing your soap bars. Experiment with different molds, colors, and scents to craft one-of-a-kind creations that reflect your style and personality. Elevate your self-care routine with handcrafted soaps that are as beautiful as they are functional. Let your imagination run wild and transform your bathing experience with custom-designed soap shapes that are sure to make a splash.
Mastering DIY Soap Molds
Elevate your soap making game by mastering DIY soap molds. Create unique and personalized bars of soap by crafting your own molds using simple materials like silicone, wood, or even recycled containers. Experiment with different shapes, sizes, and designs to truly make your soap stand out. With a little creativity and practice, you’ll be able to take your soap making hobby to the next level and impress friends and family with your handmade creations. Start mastering DIY soap molds today and unleash your inner artisan.
By investing in making custom soap molds, you are not only enhancing the visual appeal of your products but also ensuring a unique and personalized touch that sets your brand apart. With endless design possibilities and the ability to cater to specific shapes and sizes, custom soap molds offer a creative and practical solution for soap makers looking to elevate their craft. Embrace the opportunity to showcase your creativity and individuality through custom soap molds, and watch as your products stand out in a saturated market.